fbpx
CLOSE MENU

Thanksgiving Tablescape Ideas and Tips

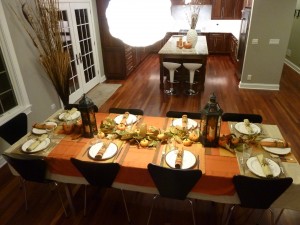
fall thanksgiving table decorations created by Normandy Desginer Heather Dalskov“A well done table setting really sets the tone for a party, making everyone feel more festive and welcome,” says Normandy Designer Heather Dalskov.  “If you’re someone that typically decorates for the holidays, like me, then setting your table is easier than you might think.  For instance, most of my tablescape is comprised of the fall décor around my home, such as the pumpkins, leaves and lanterns, that add beautiful texture to the table.  Gathering those items made it thanksgiving tablescape ideas created by Normandy Designer Heather Dalskoveasy to narrow the color scheme.”

“I used two tablecloths for this setting, a large beige one and a smaller orange one to bring in a fall color.  Then I used a fall colored table runner down the center, along with a few matching placemats,” commented Heather.  “To add some glamour to the setting and add contrast to the rustic lanterns, I used a few golden placemats and gold and silver china.  In my book, it’s perfectly fine to mix china, as long as it all follows the overall color scheme you’re working with.  If you find yourself without enough china, you can actually buy some upscale disposable plates that match your décor at a party store or online.”

“I also set up a buffet area for the food, so that my tablescape stays intact as long as possible,” says Heather.  “To get your tablescape started, I recommend gathering the items at least a week beforehand, so you can see what you have and what you might need.  Also, make sure you set aside time to iron your table linens – it always takes longer than you think!”


5 Steps to Refinishing Your Hutch Without Sanding It

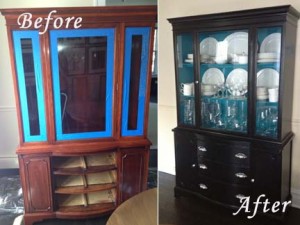
refinishing hutch color ideas created by Normandy Designer Ann StockardRefinishing a piece of furniture, such as a hutch, is a great way to breathe new life into it.  Normandy Designer Ann Stockard had a hutch in her kitchen that she just didn’t think fit in with the rest of the style.  “I didn’t like the color of the hutch, it didn’t match the rest of the décor and finishes in the room well,” says Ann.  “I knew I didn’t want to sand it, it just wasn’t worth that much effort in this case.  So after researching the best way to refinish the hutch without sanding it, I came up with a five step plan.

1.  I put protective flooring all around the hutch.

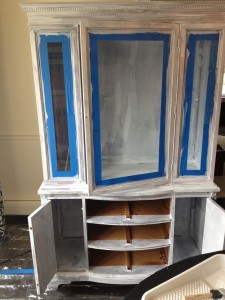
2.  I used Stix, a heavy duty primer over the entire hutch (except the glass).

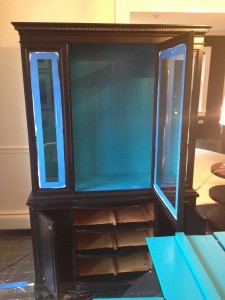
3.  I chose a black paint and applied two coats.  The materials I used to paint and prime were foam rollers, and foam brushes for the detailed areas.

4.  I chose a peacock blue/turquoise hue for the backing of the hutch to add a pop of color.  I also used it inside the drawers.

5.  I updated the hardware on the hutch to better fit the style of the rest of the kitchen.

I’ve been very happy with the final product, and haven’t noticed any chipping or peeling thus far,” commented Ann.

painting hutch color ideas created by Normandy Designer Ann Stockard  Heavy duty primer ideas created by normandy designer ann stockard


Schedule an Appointment